


Today we’re going to be creating a clean, minimal HTML layout in Photoshop, perfect for any photographer or creative professional. We’ll be using some simple effects and layer styles to achieve the minimal design.
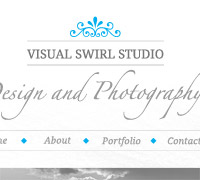
Final Website Layout

Before we begin there are a few elements you’ll want to collect to complete this tutorial:
Step 1
Download the 960 grid system from 960.gs. I’m using the 12 column layout.

Step 2
Open the template in photoshop. Now we need to expand our canvas size just a bit. Select canvas size (Image>Canvas Size) and change the layout to 1200×1200 px. Make sure to have the anchor set to the top middle so that our grid layers stay centered.

Step 3
I often like to create an area of swatches for my design to easily pick colors on the fly. I’ll create three boxes in the top right filled with the following colors: #777777, #DDDDDD, and #00aeef. Turn on the guides (shortcut: cmd+;) and we’re setup to create.

Step 4
Let’s start with our title. We’ll be using Droid Serif for our main text. Set font size to 24px and color to #77777. Center text on page using grid layout.

Step 5
Let’s add some top and bottom borders to the title. Open up the line tool and set it to 1px width and we’ll use the lighter grey (#777777). Add a top line and duplicate it¬† (alt+drag). Then select the two top layers and (alt+drag) to copy them below the title. Finally grab the custom shape tool and open the ornaments shape group (found in the small menu in the top right of the shapes drop down). I’m using ornament 5 (see image) and our light blue color to draw out an ornament above the title.


Step 6
The last part of our header logo will be our sub-heading. This site is for a design/photography studio so let’s use a large script font (I’m using Zapfino) to write out “Design and Photography”.

Step 7
Let’s add a textured scroll button at the top of the page for very visible call-to-action. With our blue color selected, draw out a rectangle at the top right of the document. Align with the 960 grid.

Step 8
Grab your pen tool and add a point in the bottom-center line. Grab your convert-point tool to remove the bezier curves and drag your point up to give it the cut we’re looking for.


Step 9
Create a new layer and with the selection tool draw out two 6px selections on the edge of the scroll. Fill these areas with white to give it a nice, thick border.

Step 10
Cmd-click on the scroll base layer to turn it’s area into a selection. Inverse the selection (cmd+shift+i) and with the border layer selected in the layers menu, hit delete to remove any excess lines outside of the scroll area.

Step 11
Now we’ll convert the entire scroll into a smart object to apply some effects. In the layers menu, select both scroll and border layer, right click and select “convert to smart object” from the menu.

Step 12
Let’s add a bit of noise to give it some texture. (Filter>Noise>Add Noise). Set it to 1.5%.

Step 13
We’ll also add a very subtle drop shadow. Double click the scroll layer to open its layer styles and apply the following drop shadow.

Step 14
Finally, add some text with a call-to-action to complete the scroll button. For this design we’ll use “Hire Us”.

Step 15
Before we add the navigation, let’s add a slight background texture to boost the overall feel. I’m using the colored pencil brush set from Brusheezy. Grab a large brush with your light-grey color and paint on a large selection. Don’t worry, we’ll tone this down significantly in the next step.

Step 16
Add a layer mask to your textured layer (from the bottom of the layer menu). With the gradient tool selected draw a black to white gradient on the layer mask at the top and bottom to leave something that looks like this.

Step 17
Lower the opacity of this layer significantly (20%) to leave only the slightest texture remaining.

Step 18
Now let’s add our navigation. Type out your navigation and space it out evenly across the center of the page. I’ve added additional lines (as used in the header logo) to outline the navigation. Finally add blue diamonds (using the custom-layer tool) to separate each menu item.

Step 19
Grab a photo you want to feature on the site. I’m using this truck image. To match the tone of the site, I’m going to desaturate it (Image>Adjustment>Desaturate). You may also need to tweak levels depending on the image you select.

Step 20
Drag it into your template and resize it to fit the area. If you need to crop it, grab the selection tool, make your selection, hit cmd+shift+i to invert the selection (as we did with the scroll) and delete any excess image.

Step 21
Next we’ll add some content buckets below our primary image. I’m using our light blue and Droid Serif to make the titles. Grab your text tool and draw out a text box across 4 of our red grid areas. This will ensure that the buckets are equally balanced across the page. Drop in your text or lorem-ipsum. Finally, I’ve added another ornament (from our ornament custom-shape tool used before).

Step 22
Duplicate this text area to by alt+dragging to make 3 content buckets.

Step 23
We want to be able to show off some nice things our clients are saying so we’ll create a testimonial section at the bottom of the page. Type out the quote using our droid serif and center the text. Add light blue quotes to make it pop.

Step 24
The only thing left is our footer. We’ll create some more light-grey lines, add our copyright text and add copy our header ornament and flip it to sit below the footer (Edit>Transform>Flip Vertical)

Step 25
I’ve also copied our texture background and moved the copy to the footer to add a little more visual attention. Here is our final result.
I hope you enjoyed this simple tutorial. The clean, minimal layout would be perfect for a design or photography studio or any other type of creative professional. Let me know your thoughts in the comment section and I’d love to see any modifications that you would make to improve on the design. You can download the complete PSD using the button below.

Want More? Subscribe and We'll Deliver it to You.

 Subscribe to the RSS feed or to email updates, to get even more great content!