


In this photoshop text effect tutorial we’ll be creating a grungy, burnt wood text treatment. We’ll go over some basic blending modes and use some filters and layer styles to create a look that would be perfect for a Hollywood movie poster .
Looking for more photoshop text effects? Check out this Graffiti Text Effect Tutorial
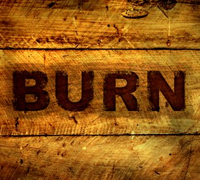
Final Image Preview
Our finished product will be a nice burnt wood text treatment cleared out of a charred and smokey piece of aged wood.

Gathering Materials
Just a couple of downloads required for this tutorial. And they’re both free:
- Wood texture by Beyond-Oddities (available at Deviant Art)
- Rough Edges brush pack from Brusheezy
Step 1
The first thing we need is the background texture. I’m using a roughed up wood image created by Beyond-Oddities. Open the texture in photoshop. I resized my texture to 1200×800 for a more manageable file size.

Step 2
Now we need to add some text. Select a brown color (I’m using #47e490e) and type out some text. I’m also using Arial Black for a nice bold typeface.

Step 3
We’re going to work our way from the outside inwards. Let’s first create the singed effect surrounding the actual text. Command+Click the Text Layer to Make a selection of the outline of the text.

Step 4
From the Select Menu choose Modify > Expand. Expand the selection by 25px.

Step 5
Create a new layer (“singed”) with this layer selected fill the selection with a dark gray (#222222). This will be used for the singed area around the burn text.

Step 6
Now we need to bring some life to the singe with a few filters. First clear the selection by pressing Command+D. With the “singed” layer selected, choose Filter > Blur > Gaussian Blur. Add a 1.8 Radius Gaussian Blur. This will help take away the hard edge.

Step 7
Next we need to add some variation with a wind effect. With the “singed” layer still selected, choose Filter > Stylize > Wind. Set the direction to “from the left.”

Step 8
Apply the same filter, this time with the direction “from the right.” Now we have a nice grainy look to complement the burnt text.

Step 9
Change the blending mode of the “singe” layer to Color Burn and set the opacity to 30%. We just want the hint of burning.

Step 10
Now let’s focus on the main text. Change the blending mode of your text layer to multiply. Now you can start to see our burn effect.

Step 11
Let’s add an inner glow to emphasize the burn. Double click the layer to bring up the layer styles. Select “inner glow” and apply the following settings:
- Blend Mode: Multiply
- Opacity: 60%
- Color: #111111
- Size: 21px

Step 12
Now we’ve got nice burned in text but it still looks to clean. We’re going to add some textured roughness to the edges. Add a vector mask to the text layer by clicking on the “add vector mask” at the bottom of the layer panel.

Step 13
Download and open the Rough Edges brush set from Brusheezy.

Step 14
Choose the 433 horizontal brush. With the layer mask selected and black set as your primary color, roughen up the edges of the text.

Step 15
Rotate the brush and continue around the edges until you have a nice roughed up burn.


Step 16
Let’s finish up by adding a charred effect to the background.¬† Set your foreground color to black and your background color to white. Create a new layer called “charred.” Go to Filter > Render > Clouds. Set the blending mode of this new layer to Multiply.

Step 17
With the charred layer selected, grab a large, roughed up eraser and clean up the area around the text.

Step 18
Let’s make the entire image pop. Create a new Levels adjustment layer (Layer > Adjustment Layer > Levels). Set the Black input level to 15 and the white input level to 223.

Final Image
And we’re done. A smokey burnt text treatment ready for your next project. I hope you enjoyed this tutorial and maybe picked up a technique or two. Let me know what you think in the comments below.


Want More? Subscribe and We'll Deliver it to You.

 Subscribe to the RSS feed or to email updates, to get even more great content!