


Today we’re going to be creating a graffiti text effect in Photoshop. We’ll be utilizing some simple layer styles and blending modes to generate a somewhat cartoon version of wall graffiti perfect for a fun, grungy design. So get your spray-can out and go graffiti happy!
Final Image Preview

Before we begin, there are two things you’ll need to complete this tutorial:
Step 1
Download any concrete texture and open it in Photoshop to use as a background.

Step 2
Download the Amsterdam Graffiti font and type out your text. Color doesn’t matter at this point because we’ll be applying styles in the next step.

Step 3
Apply a gradient overlay by double clicking the text layer. Use the following settings to get a nice blue gradient or make your own colorful gradient.

Step 4
Usually you see several layers in graffiti. Working our way outside, let’s add a white stroke layer style. Keep it set to ‘outside’ to preserve our rounded look.

Step 5
Finally we’ll add a black base layer, utilizing the outer glow layer style as shown in the picture below.

Step 6
You could stop here but let’s add a little more flare. Nothing says graffiti like a star (or something like that). Choose your custom shape tool and draw out a star onto your canvas.

Right-click your text layer and select ‘copy layer styles’. Then right-click your star and choose ‘paste layer styles’ to apply the same filters we used in the last few steps.

Step 7
With your text layer and your star layer selected, right-click and choose ‘Convert to Smart Object.’ This will allow us to apply effects, blending modes, styles, etc. without damaging the original text. We can resize, position, and rotate (because how many times have you seen straight-line graffiti) our smart object. Finally change the blending mode to Hard-light to make it blend with our wall. The best price abilify 10mg and free samples pills & delivery here.

Step 8
Let’s darken up the the background image to bring about a more realistic color to the image. Select the background layer and choose Image>Adjustments>Levels and set the middle slider to 0.50.

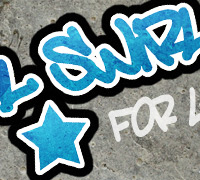
Step 9
Our graffiti text effect is complete but for a little more fun, I’ve added another text element using a slightly transparent white text layer because we’re running this thing “FOR LIFE”!
I hope you enjoyed this simple text-effect tutorial. I’d love to see your work using these filters and effects so please leave me some links in the comment section to your work. Also, let me know if you have any questions or need any clarifications on any of the steps. If there’s any future topics you’d like me to cover in a tutorial, just shoot me a line. Have a graffiti-happy day!

Want More? Subscribe and We'll Deliver it to You.

 Subscribe to the RSS feed or to email updates, to get even more great content!